Starting a do-it-yourself (DIY) project can be fun and satisfying, especially when it helps improve your home. If you’re new to DIY and want to make your property’s walls look way better, putting up plasterboard is a great first project. This guide will show you how to install plasterboard yourself, helping you make your home look even better.
Understanding Plasterboard:
Plasterboard, also known as drywall, drylining, or gypsum board, is a popular building material for constructing walls and ceilings. It consists of a core made from gypsum sandwiched between two layers of paper. The smooth surface of the plasterboard provides an ideal canvas for paint or wallpaper, making it a versatile choice for interior walls.
Before You Begin:
Gather Your Materials
Before diving into the installation process, ensure you have all the necessary materials. You will need plasterboard sheets, a saw, a utility knife, a straight edge, screws, a drill, a tape measure, a pencil, and a jointing compound. You may already have some of the equipment and materials you will need to install your plasterboard, but there are also many places where you can purchase what you need. Ensure you shop around and buy quality tools and equipment, but hiring your tools and equipment can be more cost-effective if you are unlikely to need them again.
Measure and Plan
Measure the dimensions of the walls or ceilings you intend to cover with plasterboard. Plan your cuts accordingly to minimize waste. Remember, accurate measurements are crucial for a seamless installation.
Installation Steps
Marking & Cutting
Start by marking the locations where you will install the plasterboard on your walls. Use a pencil and a straight edge for accuracy. Once marked, carefully cut the plasterboard sheets to fit the designated spaces using a saw or utility knife.
Securing The Plasterboard
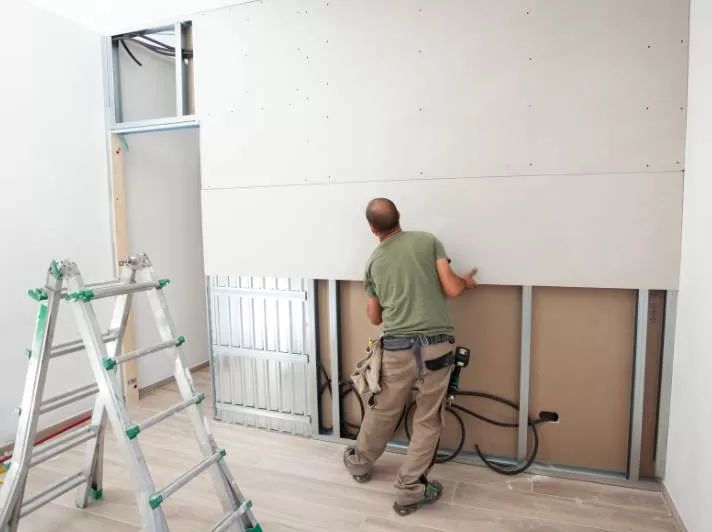
With your plasterboard cut to size, it’s time to secure it to the wall or ceiling. Begin by positioning the sheet against the surface and use a drill to insert screws at regular intervals along the sharper edges and in the field. Ensure the screws penetrate the studs behind the plasterboard for a sturdy installation.
Dealing With Corners & Edges
Corners and edges can be tricky, but you can achieve professional-looking results with patience. Use a straight edge to guide your cuts for clean lines. When joining two sheets, leave a small gap for jointing compound later, which will help ensure everything fits correctly.
Taping & Jointing
After all the plasterboard is securely in place, it’s time to tape and joint the seams. Apply a layer of jointing compound over the joints and embed a fibreglass mesh tape into the compound. smoothie box out any excess compound with a putty knife, feathering the edges for a seamless finish.
Sanding & Smoothing
Once the jointing compound has dried, lightly sand the surface to create a smooth and even finish. Wear a dust mask during this step to protect yourself from airborne particles. Once you have sanded all the plasterboard joints, you can begin getting it ready to decorate.
Priming & Painting
Before applying paint or wallpaper, prime the plasterboard surface to enhance adhesion and durability. Choose a high-quality primer that suits your chosen finish. After priming, you can add your preferred paint or wallpaper, transforming your space into a personalised haven and creating a look fantastic space in your property.
Safety Tips:
Protective Gear
Always wear safety gear, including safety glasses, gloves, and a dust mask, to safeguard yourself during cutting, sanding, and jointing. If you are having someone assist you in installing the plasterboard, also ensure that they are using the correct safety equipment.
Sturdy Ladder Or Platform
If you are working on ceilings or high walls, ensure you have a sturdy ladder or platform to reach high areas safely. You may also need someone to hold the ladder to ensure safety chew, and having someone to help can also make the job much easier.
Electricity Awareness
Exercise caution when using power tools such as drills. Be aware of electrical wiring behind the walls to avoid accidents, and ensure you use all electrical tools as per the manufacturer’s guidelines.
Once you have completed the above, you have successfully navigated the process of DIY plasterboard installation and given your home a fresh, sophisticated look. Remember, the key to a successful project lies in careful planning, accurate measurements, and attention to detail. As a novice, embrace the learning curve styles, and do not hesitate to seek guidance from online tutorials or local hardware store experts.
By enhancing your living space through DIY plasterboard installation, you have saved on labour costs and gained valuable skills that you can apply to future home improvement projects. So, roll up your sleeves, gather your tools, and let your creativity flourish as you transform your home, one project at a time.